Alchemy modelgen: Database Migrations made Easier (Part 2)
This is part 2 of the alchemy-modelgen series. Click here to read part 1 of this series. In this post, we’ll use a YAML file to perform operations on a database. We’ll look at how to define schema in YAML files, create tables from YAML, change the schema, and switch between schema versions.
Throughout this post, we’ll be using the sqlite database.
Table of Contents
- About YAML format
- Initialize alchemy-modelgen
- Write the YAML file
- Create tables for the first time in the sqlite database
- Alter the tables
- Time Travel
- Conclusion
About YAML format
Why use a YAML file? To answer the question, let’s look at what is a YAML file.
Yet Another Markup Language (YAML) is an acronym for Yet Another Markup Language. It’s a simple, human-readable file format that’s commonly used for writing configurations, documentation, and, in this case, table schemas. Scalar data types like strings, integers, and floats, as well as associative arrays like maps, dictionaries, and hashes, are natively encoded in YAML.
YAML files have a simple syntax that is simple to read and write. The colon : denotes key-value pairs, while the hyphen - denotes arrays or lists. For example, in the snippet below, the key is address, and the value is Mumbai, India.
address: Mumbai, IndiaThis syntax can be extended for complex key value pairs. For example, in the snippet below, we have address as the parent key, city, and country as the child keys and their corresponsing values as values
address:
	city: Mumbai
	country: India
As we can see, YAML files are simple to read, write, and maintain. There is no complicated syntax, they can be passed from one person to another without losing readability, and they are simple to store and maintain (they’re just text files!).
Now that we’ve learned what YAML files are and why they’re so simple to read and write, let’s take a look at how alchemy-modelgen uses them to make database maintenance easier.
The command modelgen can be used to interact with the tool. This is the cli that comes with the tool. We’ll start by initializing alchemy-modelgen, then move on to more advanced database operations.
Initialize alchemy-modelgen
A folder structure is created as a result of the initialize action. This folder is necessary for alchemy-modelgen to keep track of our database.
modelgen init -d myprojectcd myproject
This results in the following structure:
myproject
├── alembic_migrate
│   └── __init__.py
│   └── env.py
│   └── script.py.mako
│   └── versions
│ 	└── __init__.py
│   └── README
├── templates
│   └── example.yaml
└── alembic.ini
The schemas defined in the YAML file are translated to a format that alchemy-modelgen can understand using sqlalchemy, a python ORM tool. The translated files can be found in the myproject/models/ folder.
Write the YAML file
Take, for example, a food delivery app. The app stores user information such as name, address, and phone number, as well as order details such as which restaurant the user ordered from, the order amount, and the date of the order. This will be our use case for the rest of the article.
We start with 2 tables, user and order in a yaml file templates/foodelivery.yaml:
Let’s look at the YAML snippet above and see what each field means.
We’ll start with the table parent tag. The alchemy-modelgen keyword table points to the beginning of the YAML schema file.
For the parent key tables, we have two child keys: user and order. Table names are created using these keys. These names will be used to create the tables. The user who is writing this YAML can specify these keys. These aren’t keywords for alchemy-modelgen.
The tables’ structure is defined by the sub keys of the two child keys. columns is the first sub key. columns is an alchemy-modelgen keyword that should be used in its original form. We define an array of columns in the columns sections, with their keys being name, type, primary key, and so on. The following keys are supported in the columns sections:
- name: name of the column (string, ex: firstname, address, contact)
- type: datatype of the column (string, ex: integer, float, boolean, date)
- primary_key: whether the column is primary key or not (
trueorfalseare the supported only values, default isfalse) - length: length of the column (integer, ex: 10, 2, 300, etc)
- unique: whether the values in the column should be unique or not (
trueorfalseare the supported only values, default isfalse) - nullable: whether the column is allowed to be empty or not (
trueorfalseare the supported only values, default isfalse) - foreign_key: whether to reference a primary key of some other table or not. Format is
table_name.primary_key_column_name. In the example above, the tableorderis referencinguser_idfrom the tableuser
These sub keys in the column section are alchemy-modelgen keywords.
Create tables for the first time in the sqlite database
Let’s look at how to convert the YAML file into a format that alchemy-modelgen can understand, create our base (very first) version of schema, and create tables in the database now that we have the YAML file ready.
The YAML-to-alchemy-modelgen translation process is the first step. We do this by using the createmodel subcommand. -s or —source and -p or —path are the two parameters for createmodel.
The -s or —source option informs modelgen about the schema’s source, whether it’s a yaml file or an existing database. In this post, we’ll be looking at YAML. In the next installment of this series, we’ll look at the latter. Either yaml or database should be the value of -s. Our source is yaml in this case.
-p or —path tells modelgen where to find the YAML file. Using the -p parameter, we pass the filepath of the YAML file defined above. Our filepath is templates/foodelivery.yaml in this case.
modelgen createmodel -s yaml -p templates/foodelivery.yaml -aIf we look in the models folder, we should see a file called foodedelivery.py. This is the translated file that we are looking for. It’s worth noting that this file’s name is similar to that of the YAML file.
We’ll now create the table schema’s foundation, or the first version. For this version, our tool use the translated file created in the previous step. We use a subcommand called migrate for this. The following parameters are supported by migrate:
revision: revision creates a local version of the schema. It is similar togit commitcurrent: show current active versionhistory: list all the schema versionsupgrade: upgrade the database according to the current version, similar togit push
There are a few other subcommands, but we only need these in this section. In the following sections, we’ll look at the other commands.
Now let’s get started on our first version:
modelgen migrate revision --autogenerate -m 'initial migration' -p sqlite:///foodelivery.dbWhat’s going on here is that our tool is looking for modified files in the models folder. For creating corresponding version files, any modified files (in this case models/foodelivery.py) are used. The alembic_migrate/versions folder is where these version files are stored. If we search the folder, we can see a file called cb88ceb46594 initial migration.py. Take note of the file’s name. It contains our message which was passed by the -m parameter, as well as the unique identifier string cb88ceb46594 .
In the above command, we’ve passed --autogenerate, -m and -p parameters. Let’s look at what these parameters mean:
--autogenerate: automatically create the version file and tag the file with a version id-mor--message: message string to be used with the version. It is similar togit commit -m. It tells briefly what this version is about.-por--path: points to the database path. This path needs to be in sqlalchemy supported format which is
database+connector://username:password@host:port/database. Database connections supported bymodelgenare:
1. mysql:mysql+mysqlconnector://<username>:<password>@<host:<port>/<database>
2. postgresql:postgresql+psycopg2://<username>:<password>@<host:<port>/<database>
3. redshift:redshift+psycopg2://<username>:<password>@<host:<port>/<database>
4. snowflake:snowflake://<username>:<password>@<account>
5. sqlite:sqlite:///<filepath>.db
More info about the sqlalchemy url format can be found here here. Support for more databases will be added soon!
So far, we’ve translated our YAML file and created our first version file. To create tables in the database, our tool uses the version files created in the previous step. So, let’s get started on the database tables!
We again use the subcommand migrate to do this. Here, we pass the parameters upgrade head to the migrate subcommand:
modelgen migrate upgrade head -p sqlite:///foodelivery.dbBehind the scenes, our tools are looking for the latest version file in alembic_migrate/versions. This is the file that will be used to create the database tables.
The parameter upgrade means to upgrade the database to the most recent version as specified in the yaml file, while the parameter head indicates the most recent version id.
NOTE: In the above commands, we’ve used
-p sqlite:///foodelivery.db.
The alternate way to do this is by defining an environment variable DATABASE_URI. This variable can be set to the database url like
export DATABASE_URI=sqlite:///foodelivery.db.
In that case, the above commands can be like
modelgen migrate revision --autogenerate -m 'initial migration' or modelgen migrate upgrade head
This command will create a sqlite file in the directory called foodelivery.db.
Start a sqlite database interactive shell to verify the database’s tables:
sqlite3 foodelivery.db 		   # start sqlite3 shell
sqlite> pragma table_info('user');
OUTPUT
0|user_id|INTEGER|1||11|firstname|VARCHAR|0||02|lastname|VARCHAR|0||03|dob|DATE|0||04|contact|NUMERIC|1||05|address|VARCHAR(200)|0||0
In the same terminal, let’s look at the order table
sqlite> pragma table_info('order');OUTPUT
0|order_id|INTEGER|1||11|hotel_name|VARCHAR(100)|0||02|order_date|DATE|0||03|amount|FLOAT|0||04|user_id|INTEGER|0||0
Both the tables are created in the foodelivery.db sqlite database.
To exit from the sqlite shell press ctrl+c three times.
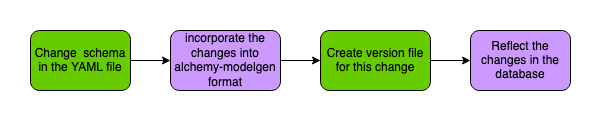
This completed our one entire end to end flow. To summarise the flow:

Alter the tables
Adding or deleting columns, changing the data type of a column, and adding or removing constraints are all examples of table changes.
Let’s take a closer look at this in the context of our use case. Let’s say as the owner of the food delivery app we want to add a new table to record the restaurant’s details. Also, we realized that during the development of the app the current length of our address column, which is 200 characters, is insufficient, and that some addresses exceed 200 characters, so we need to increase the length of the address column from 200 to 300 characters. What is the best way to accomplish this? What role can alchemy-modelgen play in this?
Let’s try to answer that. We begin by editing our yaml file which is at templates/foodelivery.yaml:
Let’s take a look at how to alter the tables. We’ll increase the length of the user table’s address column from 200 to 300 characters and add a new column to the order table called amount. We’ll also double-check that the changes are reflected in the tables.
Edit the templates/foodelivery.yaml:
We added a new table called restaurant in our foodelivery.yaml file. It has columns restaurant_id, restaurant_name, address and minimum_order_amount. We also changed the column length of the address column of table user from 200 to 300.
Let’s look at how to reflect these changes in the database.
We start by translating the YAML schema into alchemy-modelgen format. The commands are essentially the same:
modelgen createmodel -s yaml -p templates/foodelivery.yaml -aThis command will modify the already written foodelivery.py file in the models folder. These changes are made as per the changes made in the YAML file.
The next step, as before, is to create a version file for this change in the schema. We run the command to create the version file:
modelgen migrate revision --autogenerate -m 'new table restaurant added, length of address column of user table changed from 200 to 300' -p sqlite:///foodelivery.dbThe command is same as before, with a slight difference. The value of -m is different from the command we ran earlier. We basically document the changes in this version of the schema using -m.
The final step is to make these changes in the database tables. To do so, we run the upgrade command:
modelgen migrate upgrade head -p sqlite:///foodelivery.dbYour changes should be in the database now!
So what’s happening here? Let’s understand what’s happening.
- The translate command
createmodelreads the YAML file. It scans the YAML file for any changes. It then modifies our filemodels/foodelivery.pywith the changes captured from the YAML. - The next command, the
migrate revisionscans the filemodels/foodelivery.pyfor any changes. Since the translate step modified the file, themigrate revisionpicks up the changedmodels/foodelivery.pyfile and creates a new version file in the folderalembic_migrate/versions/. The version file name should look something likea0a05246e7f7_new_table_restaurant_added_length_of_.py. The first part of file name is the version id and the second part is the commit message we passed through-m. - Our final command
migrate upgrade headlooks for the latest version file, reads the changes in the file and changes the tables accordingly.
That’s it! Let’s verify if the database got changed or not. We start the sqlite database shell and look through the table structure of the three tables:
sqlite3 foodelivery.db
sqlite> pragma table_info('user')
OUTPUT
The above command shows the following output:
0|user_id|INTEGER|1||11|firstname|VARCHAR(20)|0||02|lastname|VARCHAR(20)|0||03|dob|DATE|0||04|contact|NUMERIC|1||05|address|VARCHAR(300)|0||0
Note the change in the length of the 5th column address. It’s now 300!
Let’s verify if our restaurant table is created or not:
sqlite> pragma table_info('restaurant');OUTPUT
The above command results in the following output:
0|restaurant_id|INTEGER|1||11|restaurant_name|VARCHAR(50)|0||02|address|VARCHAR(300)|0||03|minimum_order_amount|FLOAT|0||0
Bingo! Our restaurant table is created in the database!
This completes another end to end flow of altering the schema of an existing table and adding a new table. To summarise the flow:
Modelgen performs these operations behind the scenes using Alembic.
Time Travel
One of the issues we run into when changing the schema of database tables is figuring out how to undo any changes or go back in time to a previous version of the schema. Let’s pretend we were wrong about changing the address column length and adding the restaurant table in our example. They aren’t required! What should we do now? What is the best way to get around this issue?
Let’s try to answer these questions.
For travel back in time, we first need to know which version is currently active in the database. To know that, we use migrate current subcommand. To know the active version:
modelgen migrate current -p sqlite:///foodelivery.dbmigrate current tells you which version is the database at, at this point in time. The output of the command should look something like this:
INFO [alembic.runtime.migration] Context impl SQLiteImpl.INFO [alembic.runtime.migration] Will assume non-transactional DDL.a0a05246e7f7 (head) # Note this line
Note the last line of the output. a0a05246e7f7 is the id of the active version which is deployed to the database.
We now list all the versions and look through the history of changes made to the database. To do so, we use migrate history subcommand:
modelgen migrate history -p sqlite:///foodelivery.dbmigrate history scans the alembic_migrate/versions folder and lists all the versions we have so far.
The output of this command should be similar to this:
cb88ceb46594 -> a0a05246e7f7 (head), new table restaurant added, length of address column of user table changed from 200 to 300<base> -> cb88ceb46594, initial migration
Note the version ids and the commit messages. Those are the commit messages we entered while creating or changing the database.
From our previous command, we know the id of the active version which is a0a05246e7f7. We want to move back to the previous schema. From the above command, we know the id of the previous version is cb88ceb465941.
Let’s try to move to this version now. Inorder to do this, we use migrate downgrade subcommand:
modelgen migrate downgrade cb88ceb46594 -p sqlite:///foodelivery.dbWe need to pass the id of the version we want the database to downgrade to. We can now verify the changes in the database using the sqlite3 commands from the previous sections.
migrate downgrade command pulls down the database from newer version to and older version. In this case, it pulls the database down from version a0a05246e7f7 to cb88ceb46594.
In this section, we’ll look at how to migrate from a newer version to an older one, as well as from an older version to a newer one.
In alchemy-modelgen’s terms, migrating to an older version is referred to as a downgrade, while migrating to a newer version is referred to as an upgrade.
Let’s suppose after a few months, we want to move again to the newer version of the schema. We need the address column’s length to be 300 and we need the restaurant table now. How to do that?
In order to move to a newer version of schema (or upgrade schema in alchemy-modelgen’s terms), we start by listing the current active version:
modelgen migrate current -p sqlite:///foodelivery.dbThe command should output something similar to:
INFO [alembic.runtime.migration] Context impl SQLiteImpl.INFO [alembic.runtime.migration] Will assume non-transactional DDL.cb88ceb46594
Note the current version id.
Next step is to list all the versions and look through the history of the versions to determine which version we want to upgrade our database to. To do this, we use the command migrate history:
modelgen migrate history -p sqlite:///foodelivery.dbThe command should output somthing similar to:
cb88ceb46594 -> a0a05246e7f7 (head), new table restaurant added, length of address column of user table changed from 200 to 300
<base> -> cb88ceb46594, initial migration
As we can see, our current version cb88ceb46594 needs to be upgraded to a0a05246e7f7. We do that with migrate upgrade command:
modelgen migrate upgrade a0a05246e7f7 -p sqlite:///foodelivery.dbThe database should be upgraded to the version a0a05246e7f7 where we have the restaurant table and the column length of address column of the user table is 300, instead of 200!
Conclusion
In this post, we learned how to perform database operations using a YAML file as the table schema’s source. In the next post, we’ll look at how to perform database operations using another database as the table schema source.